
Hi everyone, today I'm going to show you how to place an order on Firmoo, so you can easily get your new pair of glasses at an extremely competitive price (here and here are my own glasses).
Ciao a tutti, oggi vi mostro come fare un ordine su Firmoo, così che possiate avere facilmente i vostri nuovi occhiali ad un prezzo super competitivo (qui e qui vi mostro i miei).
This is the page you get after you've clicked on the frame you have chosen: you can choose the colour on top page on the right, and you can also upload a picture of you to virtually try the frame on and see if it can suit your face on the left.
Questa è la pagina che avrete davanti dopo aver cliccato sulla montatura che avete scelto: potete anche scegliere il colore cliccando su “Select colour” in alto a destra, e addirittura caricare una vostra foto per provare virtualmente la montatura e capire se vi sta bene oppure no, sulla sinistra.
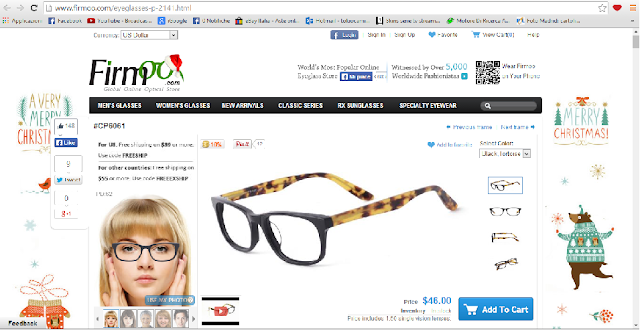
Going down the page, you'll also find all information about the frame: material, measurements, so that you can compare it to your current one and understand if it can fit you.
Scorrendo la pagina, vi
trovate anche tutte le info utili riguardo alla montatura: dal
materiale alle misure, così da poterle confrontare con i vostri
occhiali e farvi un'idea sulla taglia.

You have to select the option that matches your need (you can even select to buy plain lenses or no lense at all).
2-PLEASE INPUT YOUR PRESCRIPTION.
Now you've got the hardest part (at least it's been so for me). If you have your doctor's prescription that might be easy, but maybe not, so I'll guide you through it.
-Pupillary distance. It is the distance between the very centres of your pupils, you may find this measurement on your prescription, or you can even measure it by youself, as I did. You only have to ask someone to take a ruler and measure the distance between the very centres of your pupils. Try more than once and if the results are different, make an average. Remember this measurement is calculated in millimeters in the site, so don't think you have totally failed in measuring xD
-SPH (Sphere) stands for myopia.
-CYL (Cylinder) stands for astigmatism
-AX (Axis) stands for the meridian of your astigmatism (so you'll have this value ONLY if you have CYL value as well): it goes from 1 to 180 (degrees).
- ADD (Addition) stands for presbyopia.
Then you have “Click to add prism” which is useful if you have special needs for the shape and the curve of the lenses (I personally don't, so I didn't select the option), but it'll cost you 12,95 $.
Then you can save the prescription so that next times you order you won't have to insert the data again.
Se avete scelto la vostra montatura, cliccate su “Add to cart” e avrete davanti questa nuova schermata.

Vi spiego ogni punto, dal momento che per me non è stato facilissimo e immagino possa non esserlo per alcuni di voi.
1.HOW WILL YOU USE YOUR GLASSES?
Adesso dovete selezionare l'opzione che corrisponde all'uso che fate delle vostre lenti, tra cui anche uso puramente estetico (lenti non graduate) o addirittura ricevere soltanto la montatura.
-Pupillary distance (distanza pupillare). Si tratta della distanza tra il centro delle vostre pupille. Se non la conoscete, potete benissimo misurarla per conto vostro, io stessa ho fatto così. Basta chiedere a qualcuno che vi posizioni un righello dal centro esatto di una pupilla al centro esatto dell'altra e fare più di un tentativo. Se I risultati sono diversi, fate una media. Ricordatevi che sul sito questa misura è in millimetri, quindi non abbiate paura di aver sbagliato se non vi torna la cifra che avete ottenuto, basterà moltiplicarla per 10 ;)
-SPH (Sphere) sta per miopia.
-CYL (Cylinder) sta per astigmatismo.
-AX (Axis) sta per il meridiano riferito al vostro astigmatismo (quindi avrete questo valore SOLO se avete anche il valore dell'astigmatismo): va da 1 a 180 (gradi).
- ADD (Addition) sta per presbiopia.
Dopo vi trovate la casella “Click to add prism”, che selezionerete solo se avete bisogno che le vostre lenti siano modellate/curvate in un certo modo (di più non so dirvi, io non ne ho bisogno); in tal caso vi costerà 12,95 $.
Poi avete il “Save prescription” che vi permette di salvare la vostra prescrizione in modo da non dover reinserire tutti i dati nei prossimi ordini.
Now click on
“Continue” and you get a list of all kinds of lenses you can
choose from.A questo punto cliccate su “Continue” e avrete la lista di tutti i tipi di lenti che potete ordinare.

After you've picked the option you like, click on “Continue”.
Dopo che avete scelto il vostro tipo di lenti, cliccate su “Continue”.
I hope that was helpful, don't hesitate to ask me for further information.
Spero il post vi sia stato utile, se qualcosa ancora non vi è chiaro, chiedetemi pure.
Kisses
Baci

Ciao a tutti, oggi vi mostro come fare un ordine su Firmoo, così che possiate avere facilmente i vostri nuovi occhiali ad un prezzo super competitivo (qui e qui vi mostro i miei).
This is the page you get after you've clicked on the frame you have chosen: you can choose the colour on top page on the right, and you can also upload a picture of you to virtually try the frame on and see if it can suit your face on the left.
Questa è la pagina che avrete davanti dopo aver cliccato sulla montatura che avete scelto: potete anche scegliere il colore cliccando su “Select colour” in alto a destra, e addirittura caricare una vostra foto per provare virtualmente la montatura e capire se vi sta bene oppure no, sulla sinistra.

Going down the page, you'll also find all information about the frame: material, measurements, so that you can compare it to your current one and understand if it can fit you.

If you've chosen to buy
that frame, click on “Add to cart” and you'll see this new
paragraph.
I'll explain what each point means:
1- HOW WILL YOU USE YOUR
GLASSES?
You have to select the option that matches your need (you can even select to buy plain lenses or no lense at all).
2-PLEASE INPUT YOUR PRESCRIPTION.
Now you've got the hardest part (at least it's been so for me). If you have your doctor's prescription that might be easy, but maybe not, so I'll guide you through it.
-Pupillary distance. It is the distance between the very centres of your pupils, you may find this measurement on your prescription, or you can even measure it by youself, as I did. You only have to ask someone to take a ruler and measure the distance between the very centres of your pupils. Try more than once and if the results are different, make an average. Remember this measurement is calculated in millimeters in the site, so don't think you have totally failed in measuring xD
-SPH (Sphere) stands for myopia.
-CYL (Cylinder) stands for astigmatism
-AX (Axis) stands for the meridian of your astigmatism (so you'll have this value ONLY if you have CYL value as well): it goes from 1 to 180 (degrees).
- ADD (Addition) stands for presbyopia.
Then you have “Click to add prism” which is useful if you have special needs for the shape and the curve of the lenses (I personally don't, so I didn't select the option), but it'll cost you 12,95 $.
Then you can save the prescription so that next times you order you won't have to insert the data again.
Se avete scelto la vostra montatura, cliccate su “Add to cart” e avrete davanti questa nuova schermata.
Vi spiego ogni punto, dal momento che per me non è stato facilissimo e immagino possa non esserlo per alcuni di voi.
1.HOW WILL YOU USE YOUR GLASSES?
Adesso dovete selezionare l'opzione che corrisponde all'uso che fate delle vostre lenti, tra cui anche uso puramente estetico (lenti non graduate) o addirittura ricevere soltanto la montatura.
-Pupillary distance (distanza pupillare). Si tratta della distanza tra il centro delle vostre pupille. Se non la conoscete, potete benissimo misurarla per conto vostro, io stessa ho fatto così. Basta chiedere a qualcuno che vi posizioni un righello dal centro esatto di una pupilla al centro esatto dell'altra e fare più di un tentativo. Se I risultati sono diversi, fate una media. Ricordatevi che sul sito questa misura è in millimetri, quindi non abbiate paura di aver sbagliato se non vi torna la cifra che avete ottenuto, basterà moltiplicarla per 10 ;)
-SPH (Sphere) sta per miopia.
-CYL (Cylinder) sta per astigmatismo.
-AX (Axis) sta per il meridiano riferito al vostro astigmatismo (quindi avrete questo valore SOLO se avete anche il valore dell'astigmatismo): va da 1 a 180 (gradi).
- ADD (Addition) sta per presbiopia.
Dopo vi trovate la casella “Click to add prism”, che selezionerete solo se avete bisogno che le vostre lenti siano modellate/curvate in un certo modo (di più non so dirvi, io non ne ho bisogno); in tal caso vi costerà 12,95 $.
Poi avete il “Save prescription” che vi permette di salvare la vostra prescrizione in modo da non dover reinserire tutti i dati nei prossimi ordini.

After you've picked the option you like, click on “Continue”.
Dopo che avete scelto il vostro tipo di lenti, cliccate su “Continue”.
Now you've got another
list of add-ons. Choose one and click on “Add to cart”.
Adesso
avete un'altra lista, in cui potete scegliere i comfort aggiuntivi
per le vostre lenti. Sceglietene uno e cliccate su “Add to cart”.


Now follow the
instructions and complete checkout.
Adesso seguite le
istruzioni e completate l'ordine.I hope that was helpful, don't hesitate to ask me for further information.
Spero il post vi sia stato utile, se qualcosa ancora non vi è chiaro, chiedetemi pure.
Kisses
Baci

Nessun commento:
Posta un commento